LED map assembly instructions
Thank you for choosing our product ! The assembly of our map is fabulously simple. In the package you will find continents such as North America, South America, Greenland, Eurasia, Africa and Australia and 24 islands placed in the form. You will also find a mounted assembly template in the form of a large sheet of gray paper on which the continents and islands are died.
Parcel content
- Carton 1: Wooden world map + all add -ons in accordance with the order.
- Carton 2: LED frame + mounting system.
Contents of the set

Map assembly instructions

Put the mounting template to the wall and level it.

Locate the places where you make holes on the template.

Make holes with a 6 mm fi .

Put the mounting pins in the holes .

Get ready to screw the frame , tearing the inner part of the template.

the gray clicks 2a and screw the right places .

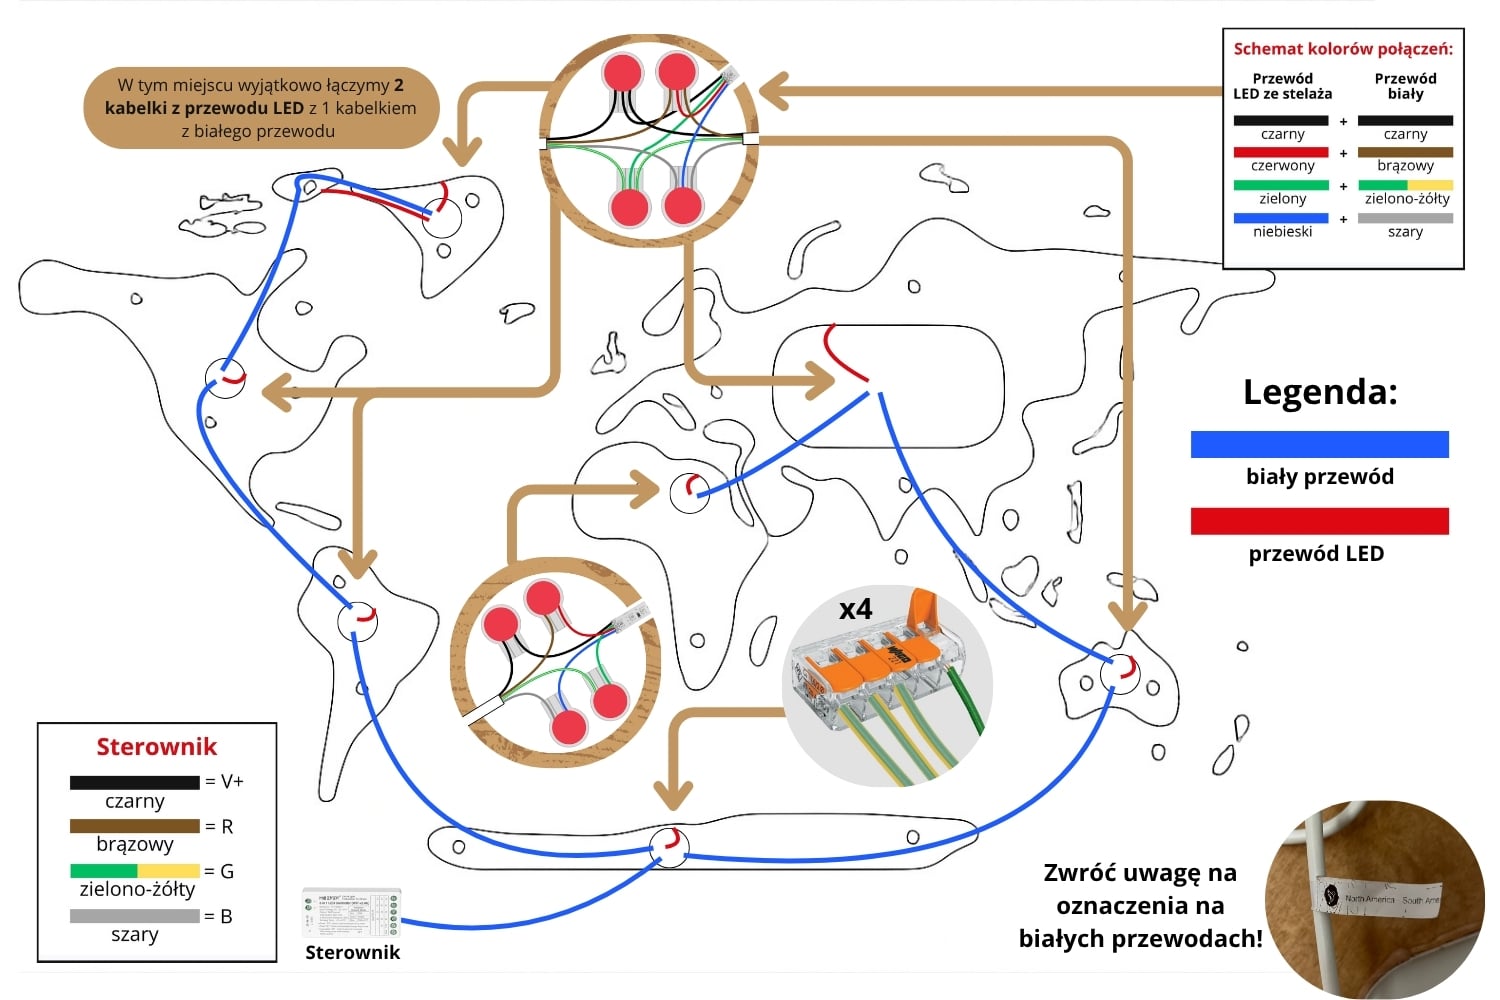
Prepare gel connectors and white cables from the set. Pay attention to the markings of the continents on the wires.

Color diagram for cable connections.

At Africa - in 4 gel connectors, connect 2 cables : 1 white cable cable + 1 cable from the LED frame. Check the connection color scheme!

For other elements - in 4 connectors, 3 cables should be connected : 1 cable from the first white cable + 1 cable from the LED frame + 1 cable from the second white cable (in the same color as from the first white cable)

At Antarctica, 4 Wago connectors and with their help connect single -color cables from 3 white wires (from South America, Australia and the controller cable) with the appropriate cable from the LED frame - according to the scheme.

Connect the cables from the second end of the controller cable to the controller : gray to [b] , green-yellow to [g] , brown to [r] , black to [+]

Connect the power supply to the power supply and first pair the remote control and then the application . [ See our guide ]

On Clicki 2A, put tags to the mounting system to transfer their position to the front of the map.

Press the map front in the place where it is to be attached - according to the mounting template.

Screw Clicki 2b in places where markers got stuck. For this purpose, use 12 × 2.5 screws .

Connect the map of the map with a bolted LED frame.

Take out the small islands from the form. A brush with a dispenser . Paint space at the islands cutting out (does not apply to natural maps)

Glue the islands according to the markings on the template. After sticking, you can remove the template from the wall.
District connection diagram

Pilot configuration and application with LED map
Security
- Children should use the map only under the care of adults .
- The map contains electrical elements and small parts that can be dangerous - this is not a toy .
- Before the first use, read the instructions carefully.
- LED assembly must be in line with the instructions - incorrect connection may cause electric or fire paralysis .
- Use the map for its intended purpose - do not modify it or use it for other purposes.
- The map must be permanently attached to the wall .
- A special application is used to control the backlight - the instructions for its use and technical requirements can be found in the film.
- Store the map in a dry place , away from moisture and water .
- Avoid extreme temperatures and sunlight .
- Do not throw a map or parts of it, avoid hitting.
- Clean it gently - with a damp cloth, then dry. Do not use detergents .
- Make sure the lighting is properly connected to the power supply.
- Disconnect the map from the power supply before cleaning - it is very important for safety.
- Fasten the map according to the instructions to avoid its accidental detachment from the wall.
Connection diagram without hiding cables
Connection diagram with hiding cables
Connection diagram with hiding cables for a 150 × 60 cm size map + Antarctica

Connection diagram with hiding cables for a map of 180 × 90 cm + Antarctica

Connection diagram with hiding cables for a map of 200 × 100 cm + Antarctica

Connection diagram with hiding cables for a map of 250 × 125 cm + Antarctica


